Integrating Secure Display Stations with Genetec Security Center
Introduction
One of the unique features of the IONODES Secure Display Station (SDS) appliances is the seamless integration with Genetec Security Center (GSC). It allows the user to control the cameras displayed on the SDS, either manually from within the Genetec Security Desk client application or automatically, based on events handled by the VMS.
This integration is supported with H.264 video compression as of IONODES SDS FW 5.6.1.3 and GSC 5.7 SR5. This integration supports H.265 video codec as of IONODES SDS FW 6.8.5.0 and GSC 5.11 with driver pack 11.7.0, or GSC 5.12 with driver pack 12.3.0. See Video stream configuration section for details on how to assign H.264 streams to the SDS on versions that do not support H.265.
Enabling Genetec integration on the Secure Display Station
To get started, you’ll need to setup the number of video outputs, or video tiles, that the SDS will expose to Genetec Security Center (GSC). Each video tile on the SDS is seen as an Analog Monitor in GSC. This defines the number of analog monitors discovered in GSC. When this is done, under the hood, the same number of data sources in the SDS are now controlled or managed by GSC, in numerical order. For instance, the ION-R100S or ION-R200 allows a maximum of 32 video tiles to be reported, and the ION-R300 allows a maximum of 48 tiles. If you choose 10 video tiles, GSC will report 10 analog monitors and will control data sources 1 to 10 in the SDS. Data sources 11 and above remain free to use for other purposes.
Step 1
This feature is enabled by default in your Secure Display Station system configuration.
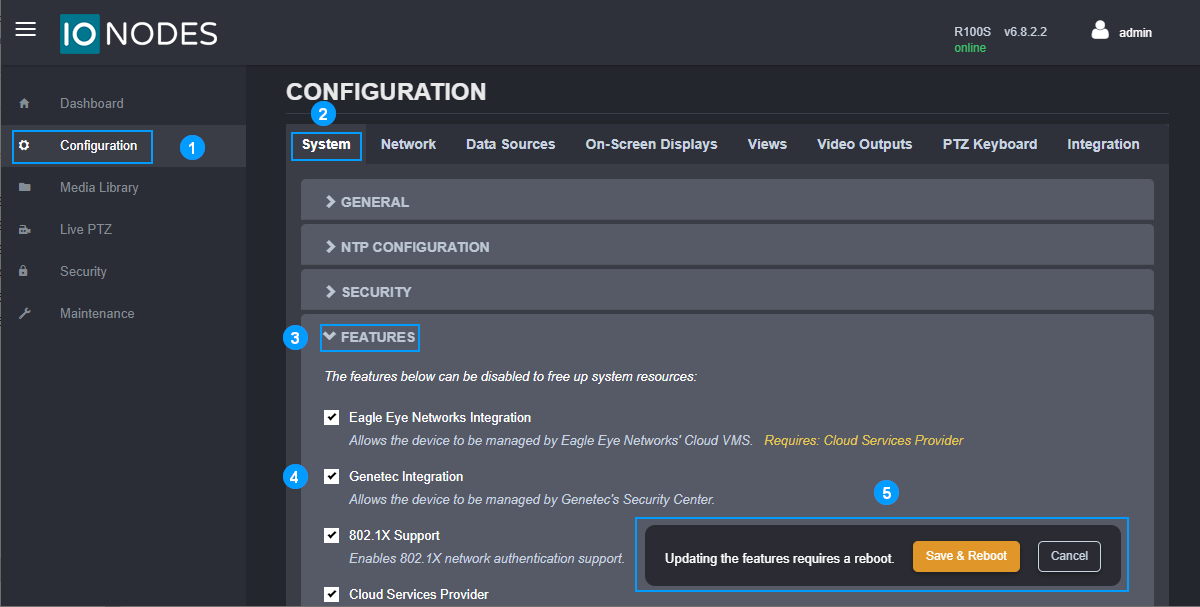
- Once logged into the SDS’s Web GUI, click on the Configuration page
- Followed by the System tab
- Expand the FEATURES section
- Ensure Genetec Integration box is checked
- If that feature was not already enabled (it is by default), click on Save & Reboot
Step 2
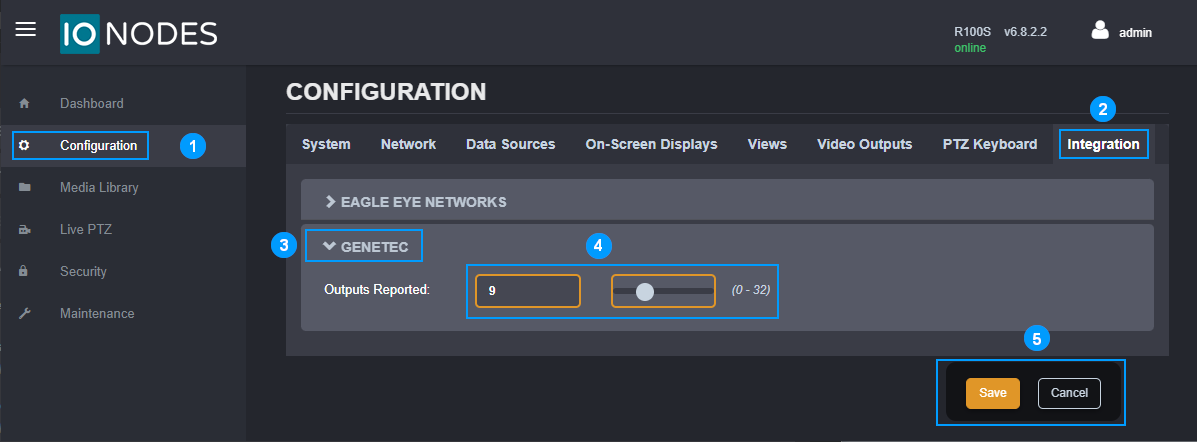
- Once logged into the SDS’s Web GUI, click on the Configuration page
- Followed by the Integration tab
- Click on the GENETEC section
- Adjust the slider to the number of analog monitors you wish to expose to the Genetec Security Center
- Save the new setting.
If this parameter is changed after the SDS is enrolled in Genetec, reboot the SDS for the change in reported outputs to take effect in Genetec.
Step 3 - Ensure Secure Display Station accepts HTTPS connections (optional)
This setting is enabled by default in your Secure Display Station network configuration.
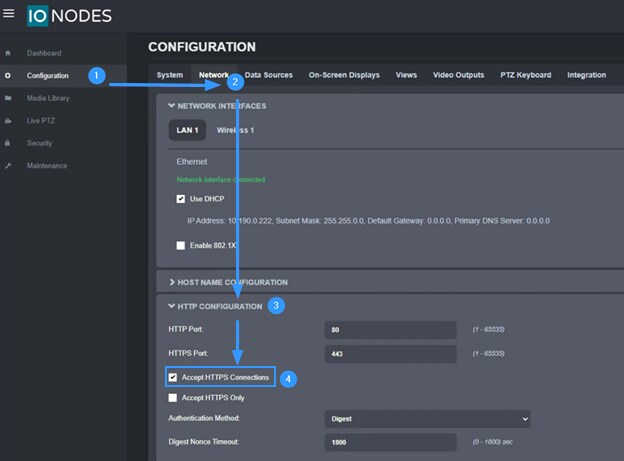
By default, the Secure Display Stations uses a self-signed certificate for HTTPS connections. To connect the SDS to Genetec Security Center (GSC) for command-and-control communication, some settings need to be configured in GSC to accept this type of certificate. These settings are detailed later in this guide. Since firmware version 6.8.1.0, you can upload your own certificates and generate certificate signing requests for the SDS web server.
Configuring the initial views on your Secure Display Station
Before using Genetec Security Center, the layout views must be configured from within the SDS’s Web GUI.
Step 1
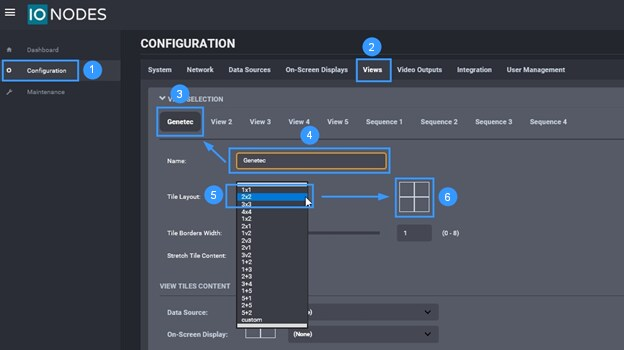
- In the SDS’s Web GUI, click on the Configuration page
- Followed by the Views tab
- Select View 1
- Rename View 1
- Select the desired layout
- Preview of the selected layout
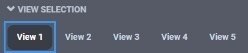
Step 2
Each video tile can display either a video stream or a web page. For this reason, we use the words Data Source when defining what is displayed in each video tile. For this integration, Data Source means IP Video Stream.
- Still in the SDS’s Web GUI Views tab, select the desired tile position
- From drop-down menu, select the desired data source to be displayed
- Repeat step 1 to select other desired tile positions
- Repeat step 2 to select desired data source to be displayed in desired tile
- In the example above, data source 2 (step 5) will be displayed in the top right tile position.
Click Save at the bottom of the Web GUI page to save all changes on the Views tab. Here is what the preview of the newly defined layout should now look like on the Video Outputs tab.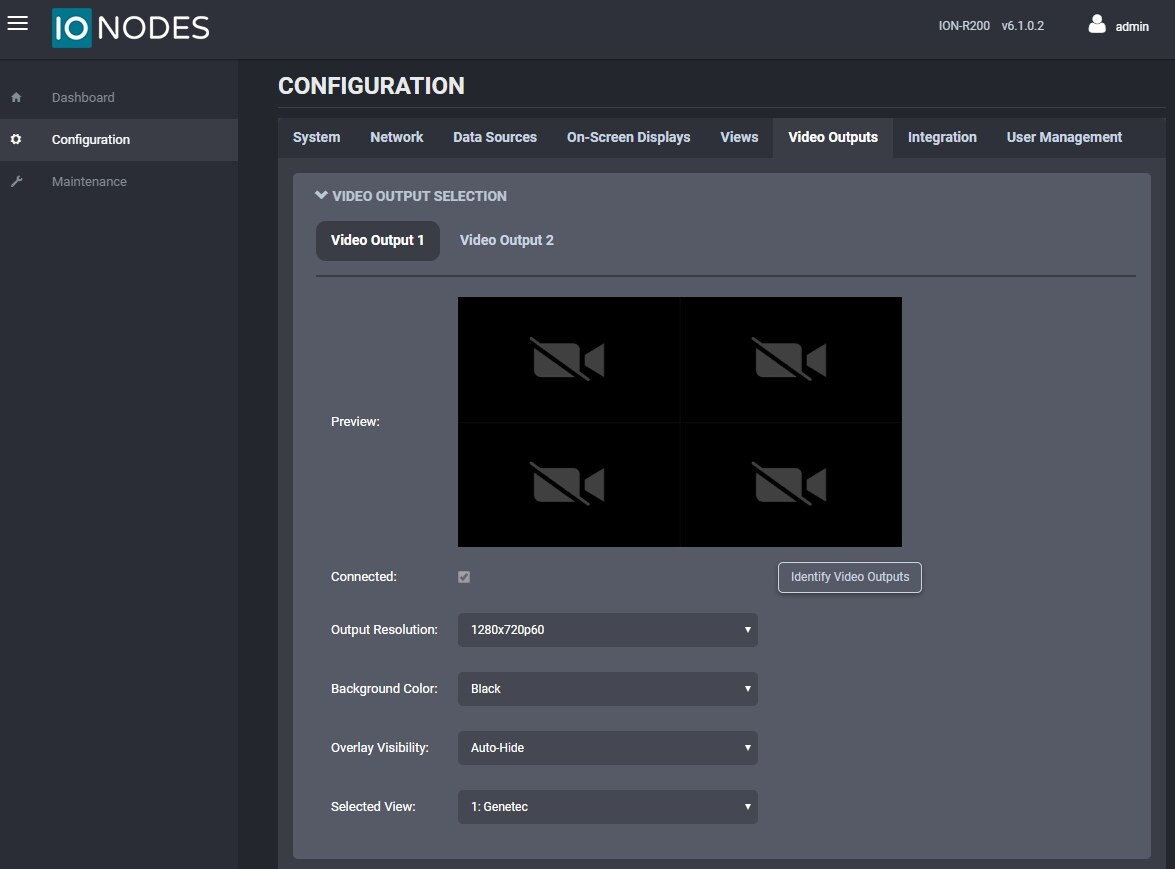
Adding the Secure Display Station to Security Center
Now that the basics are covered on the SDS, it’s time to add it to the Genetec Security Center (GSC).
Step 1
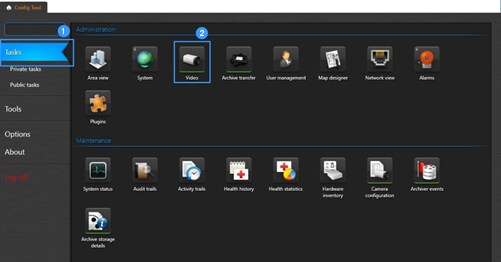
- In GSC Config Tool, click on the Tasks page
- Click on Video to add devices
Step 2
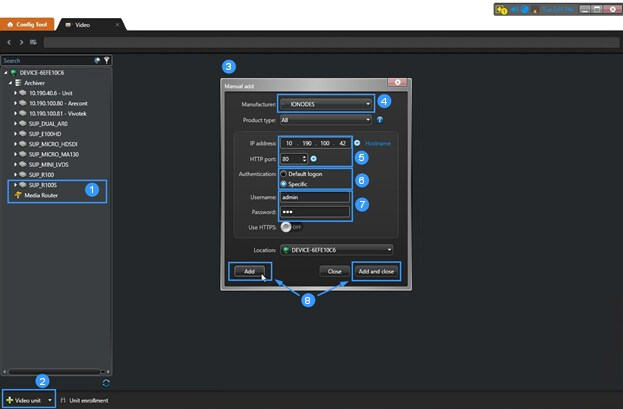
- We will be adding the ION-R200 to the device list in this example
- Click on the + Video unit to add a device
- This will open the Manual add window
- Select IONODES from the drop-down list
- Enter the IP address of your SDS
- If username & password were changed (as recommended), select Specific
- Enter the username & password to authenticate on the SDS
- Click Add or Add and Close if adding only one device
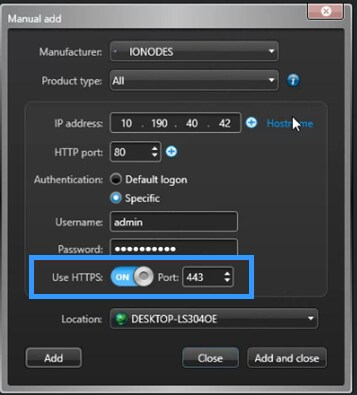
Step 3 Using HTTPS for command-and-control (optional)
To connect the SDS to Genetec Security Center (GSC) for command-and-control using secure (HTTPS) communication, enable Use HTTPS when adding the SDS.
Option 1 - Configuring Genetec to accept SDS' self-signed certificate
In GSC Archiver configuration, in the Extensions tab, Genetec extensions, expand Advanced security settings. Allow all certificates settings to ensure Genetec will accept the SDS’ self-signed certificate.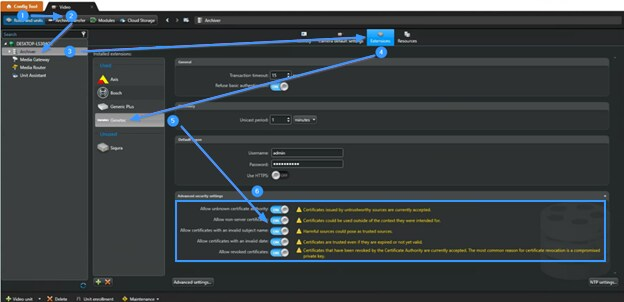
Option 2 - Installing custom certificate for SDS web server
Instead of using the SDS self-signed certificate, users can upload their own certificate. When using valid certificates, signed by an authority trusted by Genetec servers, the steps shown above to allow self-signed certificates are not required. SDS certificates are managed from the Security page of its web interface, under the Certificate Management tab. This tab is accessible only to users with Administrator role.
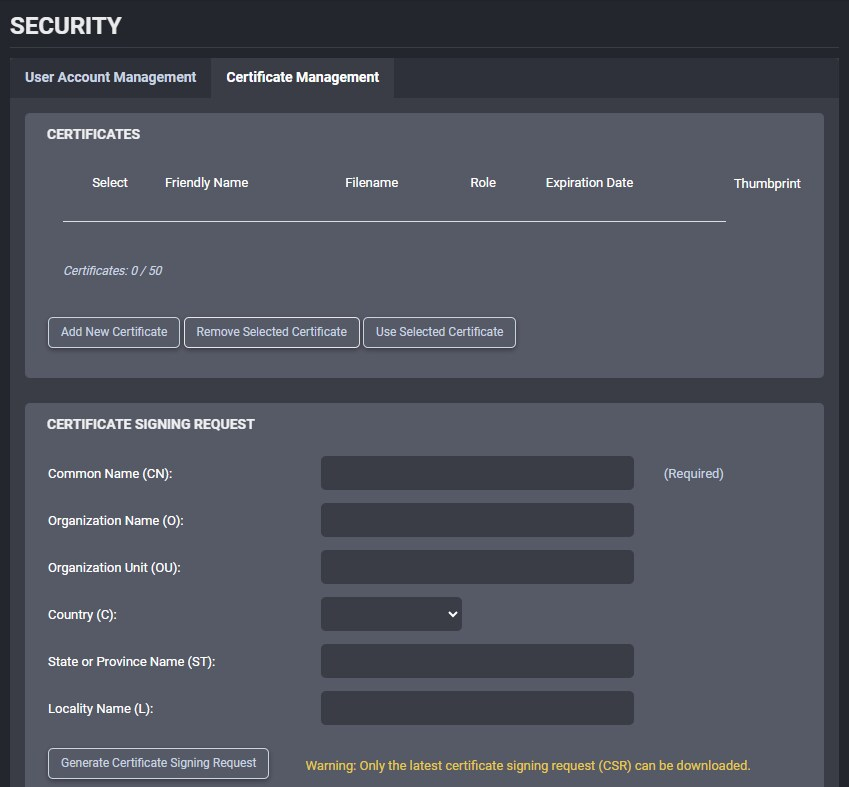
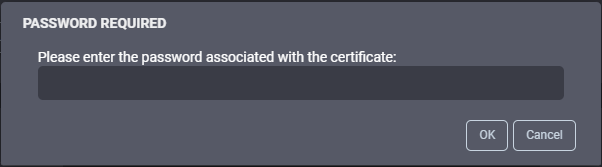
To replace the built-in slef-signed certificate used by the SDS web server, click on the Add New Certificate button. Select the certificate file to upload. The SDS accepts only password-protected PFX / PCKS #12 certificate format. Upon confirming the certificate's password, it will be added to the list of installed certificates with the Server role. Select the newly installed certificate and click on the Use Selected Certificate button. This will restart the SDS web server and disconnect your browser session.
The bottom section of the Certificate Management tab allows generating a certificate signing request (CSR) that can be transmitted to an external certificate authority (CA) to obtain a certificate. Fill in the required fields and click on the Generate Certificate Signing Request button. The CSR will be downloaded by your web browser. Transmit that file to your CA and follow the same step above to upload and use the obtained certificate for the SDS web server.
Step 4
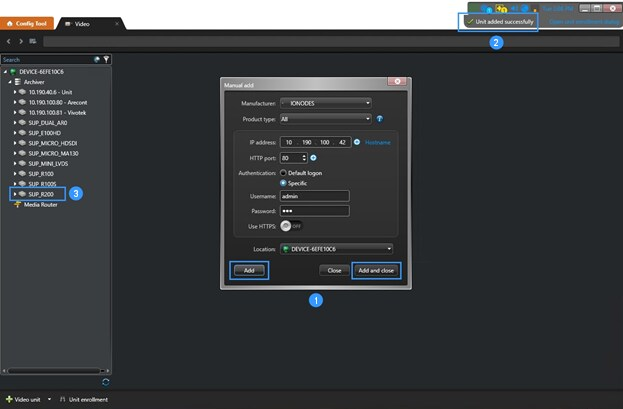
- Clicking the Add or Add and Close will…
- Add the unit and display a confirmation message that the unit was successfully added
- ION-R200 (in this example) is now added to the device list within GSC
As of GSC 5.7 SR5, IONODES SDS are supported. Each SDS will require one “Cameras and Analog Monitors” license, regardless of the number of video tiles reported.
In the example below, 32 video tiles are reported from the ION-R200.
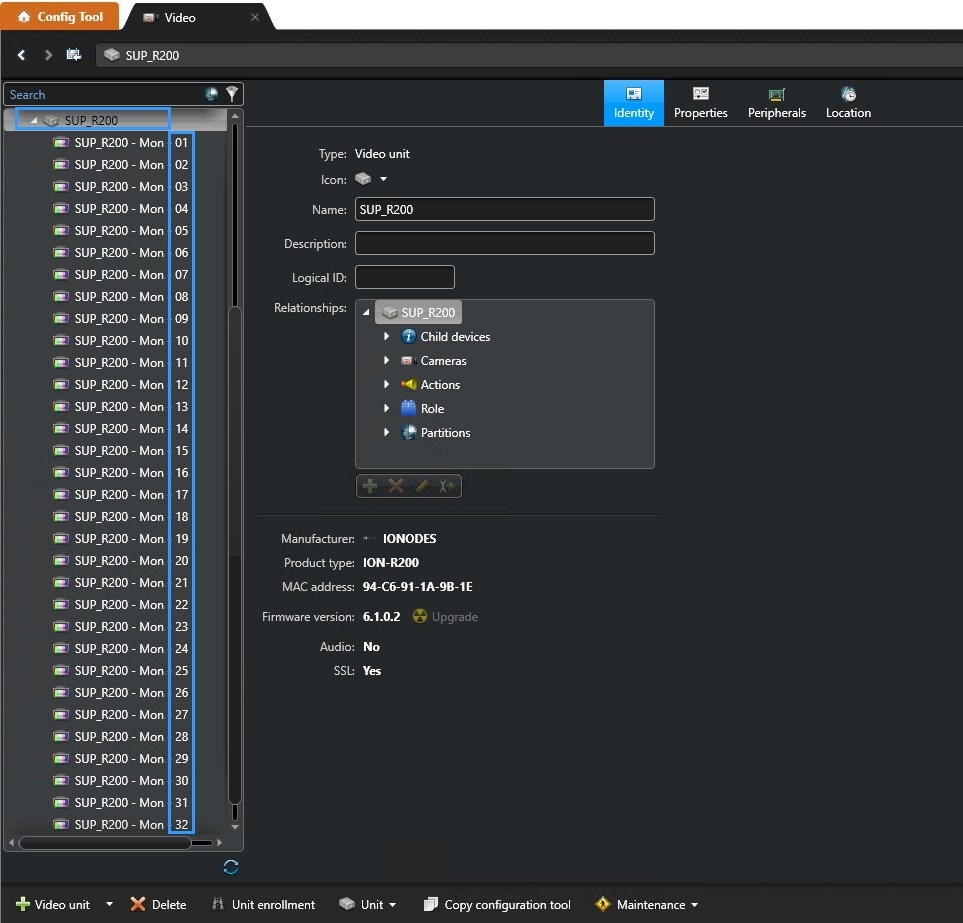
One (1) device license is used
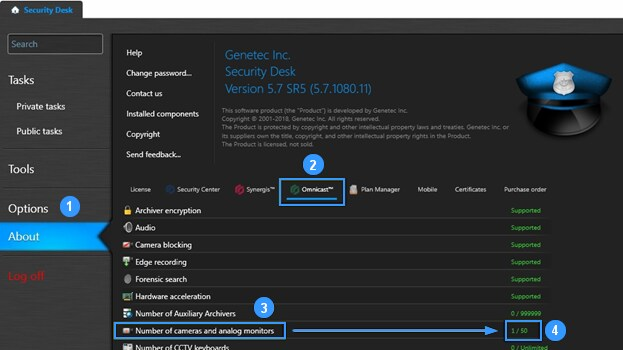
- Click on the About page of the Genetec Security Desk Config Tool
- Click on the Omnicast™ tab
- Verify the number of cameras and analog monitors
- This should be 1 if the SDS is the only device or 1 more than the number of devices enrolled before the integration of the IONODES SDS
Video stream configuration
After the SDS is added to Genetec Security Center (GSC), you can configure cameras assigned to each analog monitor from within the Security Desk > Monitoring tab. Whenever a camera is assigned to an analog monitor in GSC, the corresponding data source in the SDS is automatically assigned and configured accordingly.
Genetec’s Encrypted Video provides ‘on the fly’ encryption of video streams as they are circulated within a Security Center system. However, it is intended to only be used by Genetec’s internal video services and is therefore not compatible with third party devices such as the Secure Display Station family of products.
Step 1 - Disable Encrypted video in Genetec Security Center
Encrypted video can be disabled for all video units on an archiver using the following steps.
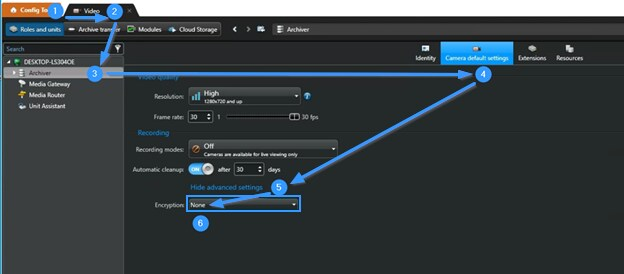
- In the Genetec Config Tool
- Select the Roles and units tab of the Video page
- Select an Archiver
- In the Camera default settings
- Show advanced settings
- Select None for Encryption.
Alternatively, encrypted video can be disabled individually for each camera that needs to be displayed on an SDS. This keeps other video streams encrypted between Genetec services.
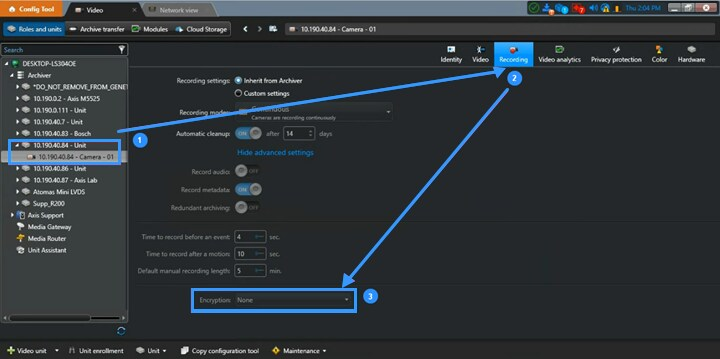
- Select a camera from Genetec Config Tool-> Roles and units tab-> Archiver
- In the Recordings settings
- Select None for Encryption.
Note that the layout of encryption settings varies slightly on different versions of Genetec Security Center
Step 2 – Assigning video streams to SDS data sources
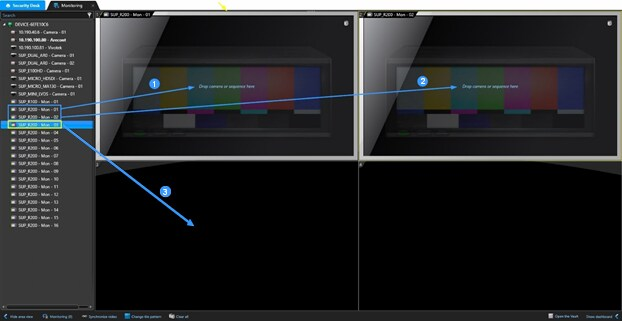
To configure a data source from Genetec Security Desk, its corresponding Analog Monitor must first be opened in a Monitoring tile. In the example above, data sources 1 and 2 are already assigned to the top tiles. The background image shown on these tiles indicates there is no camera assigned to these data sources.
In much the same manner, it is now time to decide which camera will be assigned to which data source:
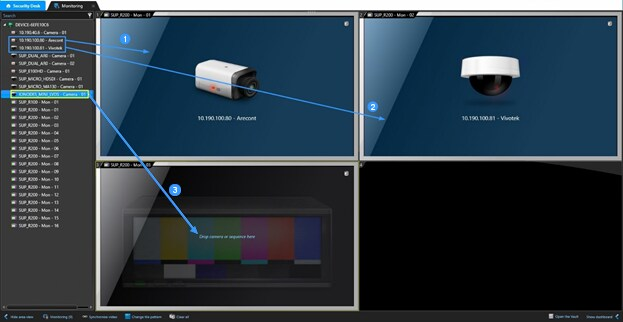
In the example above, cameras have already been assigned to the top tiles (data sources 1 and 2). A camera can be assigned to data source 3 by dragging and dropping that camera in the corresponding tile.
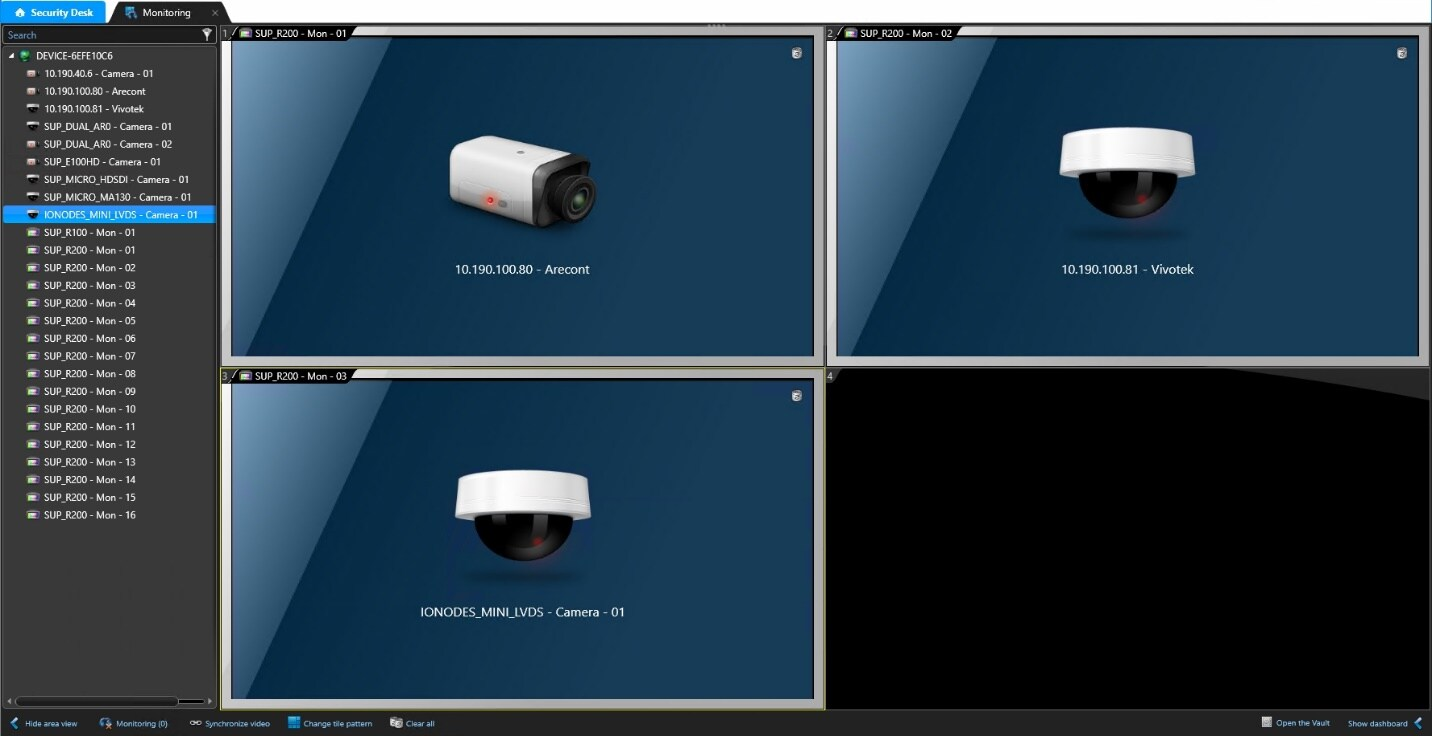
The resulting Genetec monitoring layout should now look like this:
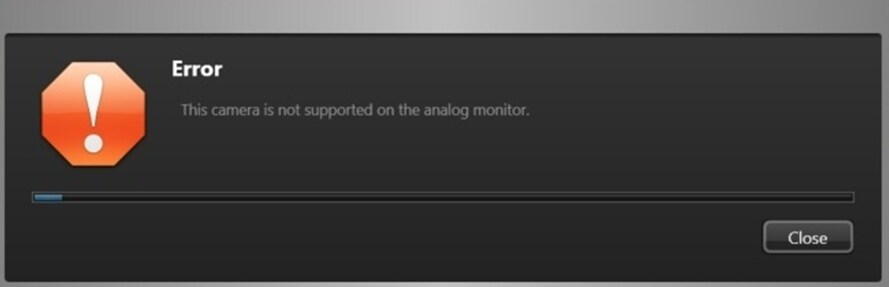
If an encrypted video stream is assigned to an SDS data source, the error message below will appear. Review previous paragraph on disabling encrypted video then correct settings accordingly.
Streaming H.264 content to IONODE SDS is supported since GSC 5.7 SR5 and SDS firmware 5.6.1.3. Streaming H.265 content requires the following:
- IONODES SDS firmware 6.8.5.0 or newer, and either of
- GSC 5.11 with drivers 11.7.0 or newer, or
- GSC 5.12 with drivers 12.3.0 or newer.
If an H.265 stream is assigned to an SDS data source and the conditions above are not met, the corresponding tile will either show a Connection Lost caption or a crossed-out camera icon (disabled data source) on the SDS video output.
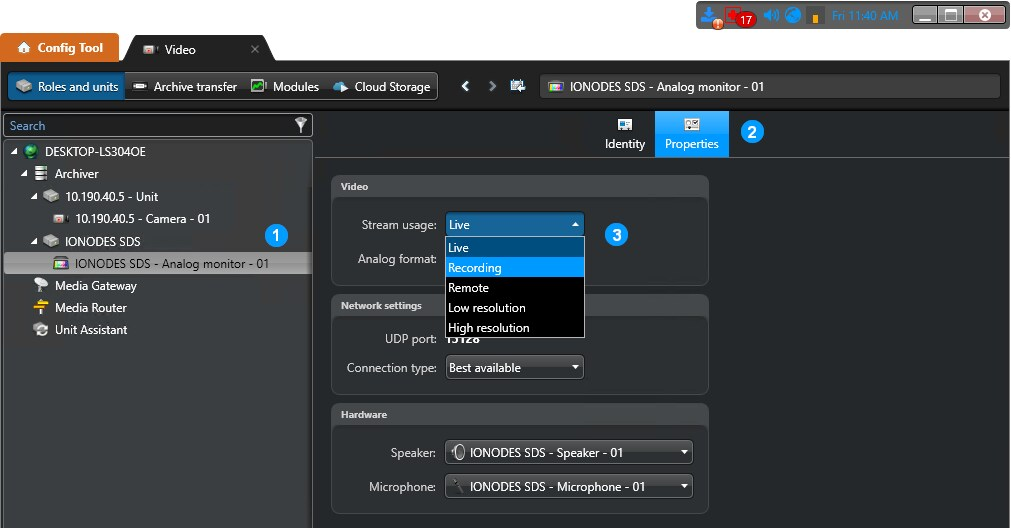
If the installed versions of GSC, drivers, and/or SDS firmware do not support H.265 integration, there are two approaches to ensure an H.264 stream is assigned to a SDS data source:
- By default, the Live stream usage is assigned to the SDS. Configure this Live stream as H.264 in Genetec Config Tool, or
- If the Live stream usage must remain in H.265:
- Configure a secondary stream usage (Recording, Remote, Low Resolution or High Resolution) with H.264 codec
- In the SDS configuration, select the analog monitor that correspond to the data source. From the Properties tab, Video section, select the Stream usage configured in step above from the drop-down menu:
Displaying video streams on SDS based on Event
Cameras can be assigned to SDS data sources from GSC’s Event-to-action feature. The example below assigns a camera to an SDS when motion is detected on that camera.
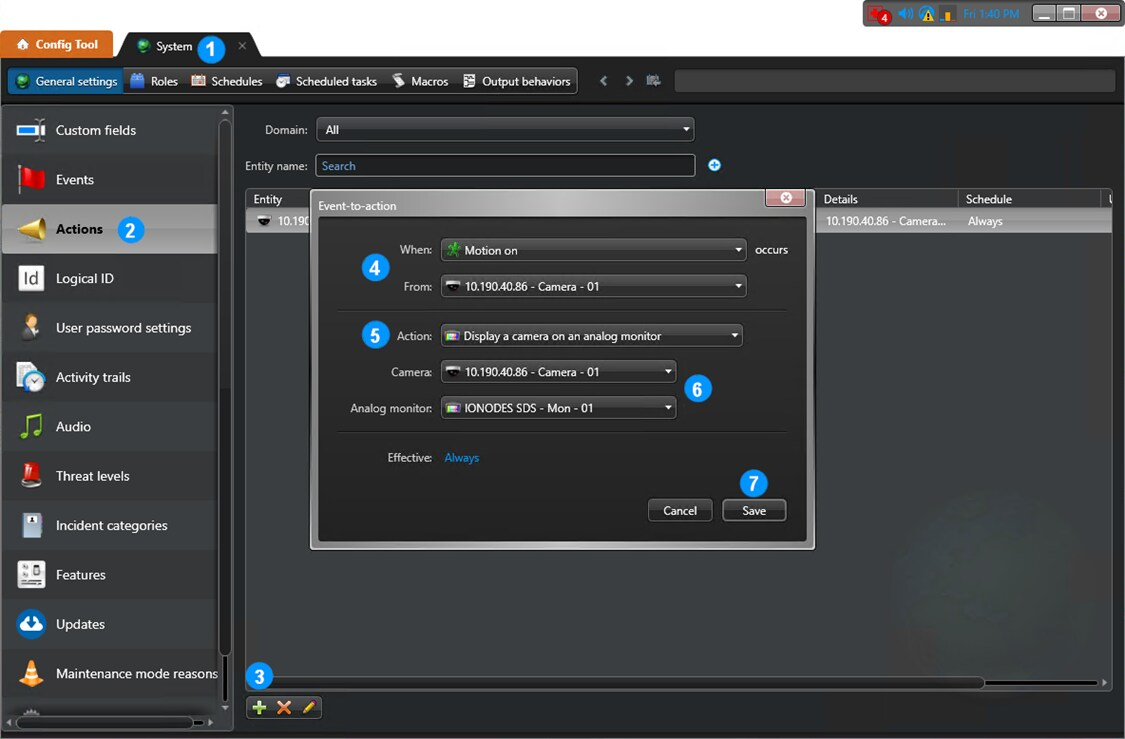
- From the Tasks / System page
- In the General settings tab, select the Actions settings item
- Click on the + icon to add an Event-to-action
- Select the event type and source
- In the Action drop-down menu, select Display a camera on an analog monitor
- Select which Camera to display in which Analog monitor (SDS data source). H.265 Codec support is subject to the same limitations stated in previous section.
- Click Save
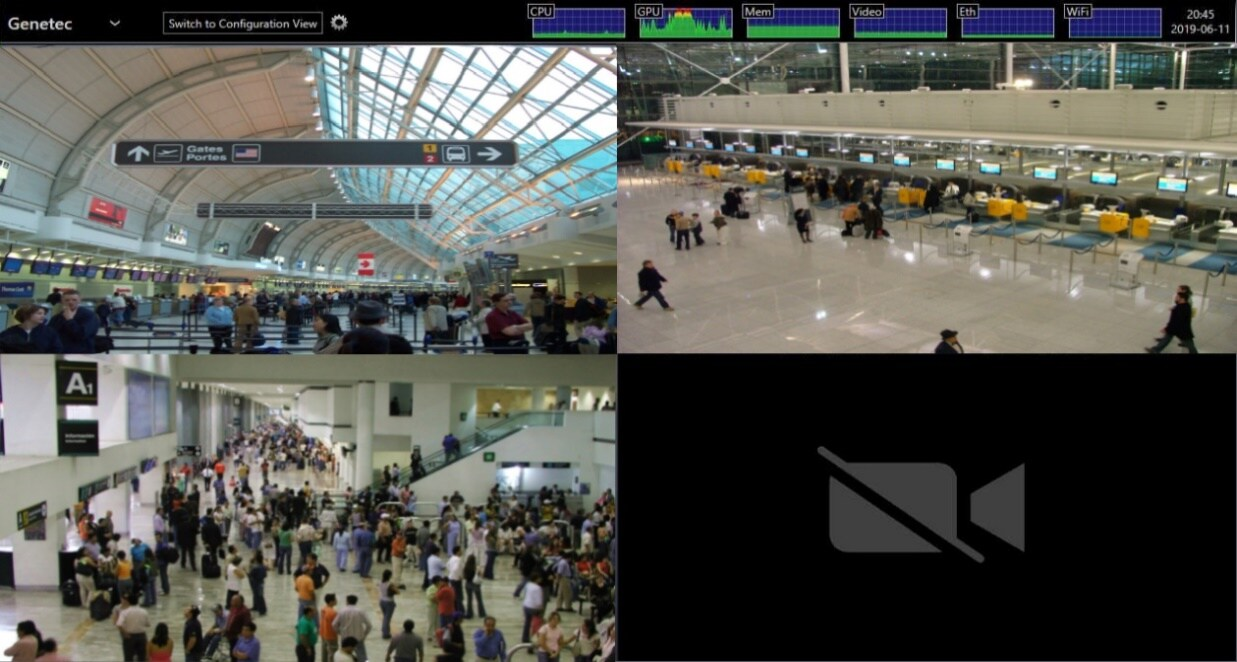
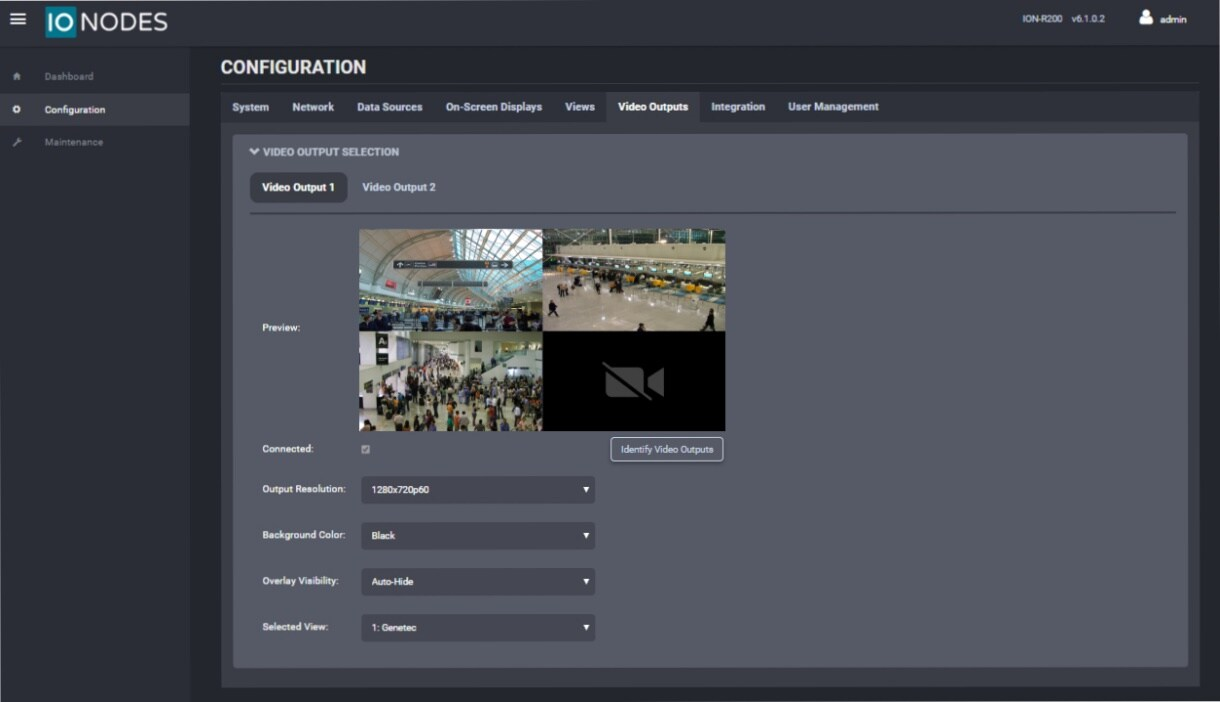
Secure Display Station Video Output
Now that the SDS has been added to the Genetec Security Desk software and that monitoring layouts have been configured on both the SDS and within Genetec Security Center, your SDS Video Output Preview(s) and actual monitoring display should reflect what has been set.
SDS Video Outputs Preview window in the Web GUI
SDS actual Video Output on video wall